When you are opening a panel in the customizer, either you get options directly (like in the »Site Identity« panel) or links to sections (like in the menu area). By default, these links look like in the screenshot below for Slider settings – the section title in a light area background with an arrow on the right side.
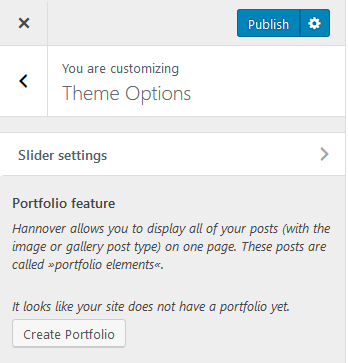
We want to change this so that we get a describing text with a button to open the section, as shown in the screenshot for Portfolio feature.
Creating template for the section head
We include the section head markup as a template into the customizer:
<?php
// Include customize control templates into the customizer.
add_action( 'customize_controls_print_footer_scripts', 'hannover_customize_templates' );
/**
* Prints templates into the customizer.
*/
function hannover_customize_templates() { ?>
<script type="text/html" id="tmpl-hannover-no-portfolio-page-notice"></script>
<?php }Code language: HTML, XML (xml)For that, we use the customize_controls_print_footer_scripts action and hook our hannover_customize_templates() function to it. In that function, we create the markup for our section head inside a script element. The ID of the script has to have the prefix tmpl-, so the template can be used via JS later.
Replace section head with template
To insert the template, we need just a few lines of JavaScript (I described how to enqueue the file into the customizer in my »Creating panels, sections, and controls with the Customize JS API« article):
;(function (api) {
	api.bind('ready', function () {
		// Replace section head with custom template.
		api.section('hannover_portfolio_page_section').headContainer.find('.accordion-section-title').replaceWith(
			wp.template('hannover-no-portfolio-page-notice')
		);

		// Add click event listener to the portfolio page section button.
		panel.container.find('.hannover-open-portfolio-page-section-button').on('click', function () {
			api.section('hannover_portfolio_page_section').expand();
		});
	});
})(wp.customize);Code language: JavaScript (javascript)
After the customizer is ready, we search for the .accordion-section-title in the head container of the section we want to modify (in our case hannover_portfolio_page_section). We replace it with our template, which we can call via wp.template('hannover-no-portfolio-page-notice'). The param for wp.template has to be the template id without the tmpl- prefix.
Then we add a click event listener to the button and open the section after the button was clicked.
Save original markup and restore it
If you need to restore the original markup later during a customize session, you can save it at the beginning for later usage. That could look like the following:
;(function (api) {
	api.bind('ready', function () {
		// Backup the original markup.
		var backup = api.section('hannover_portfolio_page_section').headContainer[0].innerHTML;

		// Replace section head with custom template.
		api.section('hannover_portfolio_page_section').headContainer.find('.accordion-section-title').replaceWith(
			wp.template('hannover-no-portfolio-page-notice')
		);

		// Add click event listener to the portfolio page section button.
		panel.container.find('.hannover-open-portfolio-page-section-button').on('click', function () {
			api.section('hannover_portfolio_page_section').expand();
		});

		document.querySelector('button.hannover-create-portfolio-button').addEventListener('click', function () {
			// Restore the original section head markup.
			api.section('hannover_portfolio_page_section').headContainer[0].innerHTML = backup;

			// Add event listener.
			api.section('hannover_portfolio_page_section').container.find('.accordion-section-title').on('click', function () {
				api.section('hannover_portfolio_page_section').expand();
			});
		});
	});
})(wp.customize);Code language: JavaScript (javascript)
The middle part is known, and at the beginning, we just save the HTML of the head container of our section in a variable. At the end of the code, an event listener is used again to restore the HTML after a button click. To do this, we assign the saved original markup to the innerHTML of the head container element and must then create an additional event listener to open the section after clicking on the section title.